Note: This is a printed version of https://employeehelp.workday.uw.edu/your-pay-taxes/overpayments/completing-the-overpayment-worksheet. Please visit this page on the ISC website to ensure you're referencing the most current information.
Completing the Overpayment Worksheet
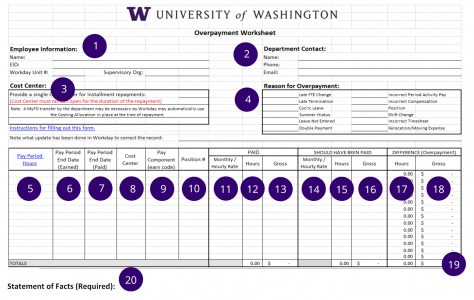
The Overpayment Worksheet provides the Payroll Office with the information needed to process the overpayment and recover the overpaid funds. This page provides field-by-field guidance for completing the Worksheet. Select the image to enlarge it, and refer to the numbered explanations below.
1. Employee Information Enter the name and EID of the employee and Workday Unit # (in Workday, search for the employee name then select Overview > Organizations). The “Cost Center Hierarchy” is the Workday Unit # and “Supervisory” is the Supervisory Org.
2. Department Contact Enter the name, full phone number (not just extension) and email.
3. Cost Center Provide one (1) cost allocation (budget) for re-payments extending beyond one pay cycle. This single budget number will provide easier and more efficient tracking and processing of the installment repayment.
Please note that in some cases Workday will auto correct the overpayment and may not use the Costing Allocation listed on this worksheet. In these cases, the department will need to initiate a MyFD transfer of funds after the corrections. Another option for overpayments that are auto-corrected by Workday would be to adjust the costing allocations.
4. Reason For Overpayment Select the reason for the overpayment.
5. Pay Period Hours List the total number of hours in the pay period in which the overpayment occurred.
There will be either 72, 80, 88 or 96 hours in a pay period (regardless of the employee’s appointment % of FTE); refer to the “Pay Period Hours” column of the Table of Pay Periods and Deadlines available on the Payroll and Workday Approval Deadline Calendar page.
6. Pay Period End Date (Earned) List the Earned Period End Date; this can be located in Workday on the Earnings and Actuals report.
7. Pay Period End Date (Paid) List the Period End Date in which overpayment was paid.
8. Cost Center List the budget number that has been charged; this can be found using the Earnings and Actuals report. List each budget line item separately.
9. Pay Component (Earn Code) List the pay component (earn code(s)) for the earnings. List each line item separately.
10. Position # List the position number charged for the overpaid employee. List each line item separately.
11. Paid – Monthly Hour/Rate List the pay rate for the overpaid position. Enter the actual pay rate, NOT the rate it should have been.
12. Paid – Hours column List the actual hours paid; this can be found on the Earnings and Actual Report. List each line item separately.
13. Paid – Gross List the actual gross salary paid for each earn code line; this can be found on the Earning and Actual Report or MyFinancial Desktop. List each line item separately. This detail is necessary to ensure accurate credit back to the overpaid budget and earn code.
14. Should Have Been Paid – Monthly Hour/Rate Enter the correct pay rate that should have been paid.
15. Should Have Been Paid – Hours Enter the correct hours that should have been paid.
16. Should Have Been Paid – Gross Enter the correct gross salary that should have been paid. A sample calculation follows:
For REG earn types – Full Time Pay Rate divided by 2 = semi-monthly salary. Semi-monthly salary divided by 72, 80, 88 or 96 (the number of hours in the pay period) = the employee’s hourly rate for that pay period. Multiply this rate by the correct number of hours that should have been paid. The result is the correct gross salary.
17. Difference (Overpayment) – Hours This number should automatically fill based on the number of hours paid and the number of hours that should have been paid. To verify the hours are correct, subtract the number of hours listed in the “Paid Hours” from the number of hours listed in the “Should Have Been Paid Hours”. The result represents the overpaid hours.
18. Difference (Overpayment) – Gross The gross overpayment amount should automatically fill based on the gross amount paid and gross amount that should have been paid. To verify the amount is correct, subtract the gross amount listed in the “Paid Gross” from the dollar amount listed in the “Should Have Been Paid Gross”. The result represents the overpaid gross salary.
19. Total Sum of Gross Overpayments Transfer this figure to the Overpayment Repayment Option Form.
20. Statement of Facts Details and notes explaining why the overpayment occurred should be entered here. This information will be provided to the employee on the Overpayment Notification form. Please make sure that this is an easy to read statement and double check it for spelling/grammar errors. This can become a legal document in the case of disputes.
